


|
Commercial Home Heavy Duty Meat Grinder Professional 1100 Watt For Meatballs / Sausages
Szczegóły Produktu:
| Place of Origin: | China |
| Nazwa handlowa: | Kitchener |
| Orzecznictwo: | ETL US; ETL;FDA |
| Model Number: | 52021206 |
Zapłata:
| Minimum Order Quantity: | 50 |
|---|---|
| Cena: | negotiable |
| Packaging Details: | 1 piece in carton |
| Delivery Time: | 45 days |
| Payment Terms: | L/C,T/T |
| Supply Ability: | 9000pcs per month |
|
Szczegóły informacji |
|||
| Construction: | Heavy-duty stainless steel | Design: | Steel gear-driven mechanism |
|---|---|---|---|
| Function: | Forward and Reverse gearing | Grinding Capacity: | 10-12lbs per minute |
| Feature: | Removable Tray | Material: | Stainless steel |
| Podkreślić: | meat chopper machine,homemade electric meat grinder |
||
opis produktu
1100W Meat Grinder Stainless Steel Electric Meat Grinder Commercial Sausage Stuffer
Sausage Stuffing Directions:
- Properly prepare casings as directed on casing packaging. Place artificial or natural intestines onto sausage funnel.
- Load hopper with prepared meat and feed meat into grinder head opening before operating unit.
- Reminder: Do not operate grinder without meat in grinder head. Damage to auger and/or motor can occur.
- Plug in and turn switch to on position when ready to start.
- Begin to feed sausage mixture into the hopper opening.
- Hold the casing on the sausage tube in to hand and slowly let the meat output pull the casing from the tube.
- Fill casing as desired by holding casing back on tube.
- Twist or tie the sausage into links as desired. Tie end of casing into a knot.
- It is recommended that 2 people perform sausage stuffing.
- Add small amounts of water to your ground meat when stuffing sausage to improve output of meat through sausage stuffing tube.
If Jamming Occurs or Performance Slows:
| 1 | Shut grinder off immediately |
| 2 | Remove power cord from outlet |
| 3 | Carefulling remove Grinder head ring cap, grinder plate and cutting blade |
| 4 | Carefully clean grinder plate holes thoroughly and remove any tendons from around cutting blade |
| 5 | Replace cutting blade, grinder plate and screw ring cap back onto grinder head |
| 6 | Continue grinding |
| 7 | Repeat steps as necessary to enhance grinder performance |
Description:
Electric Meat Grinder
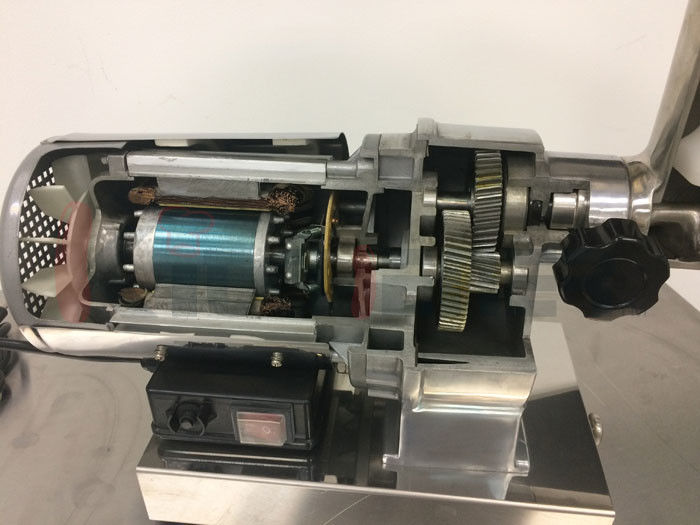
• Heavy-duty stainless steel construction
• The steel gear-driven mechanism design makes the grinding capability more powerful.
• Stainless steel housing and water-proof switch assure superior safety, as well as being rust-proof
• Removable tray organizes your grinder accessories
• Includes stainless steel cutting knife, 2 stainless steel grinding plates and a stainless steel stuffing plate
• Comes with set of 3 stuffing tubes and a meat stomper
• Stainless steel meat pan for easy cleanup and maintenance
Specifications:
| Item Number |
52023206
|
52022206
|
52021206
|
52020806
|
52020506
|
| Master Pack | 1 pc/ctn |
1 pc/ctn
|
1 pc/ctn
|
1 pc/ctn
|
1 pc/ctn
|
| Measure |
21"x20"x19" 533x508x482mm
|
19"x15"x15" 482x381x381mm
|
19"x15"x15" 482x381x381mm
|
19"x15"x15" 482x381x381mm
|
16"x14"x14" 406x355x355mm
|
| Weight | 95/75 lb.(43/34kgs) | 66/62 lb.(30/28kgs) | 44/40 lb.(20/18kgs) | 43/39 lb.(19.5/17.7kgs | 31/27 lb.(14/12kgs) |
About us:
As an certified company, Intradin’s product design, manufacturing and service comply with ISO 9001:2008 standard. All products must surpass 100% quality test including dimension, chemical, metallurgical, mechanical, physical, and endurance tests. With high social responsibility, we have passed environment management system
ISO14001:2004 and Occupational Health & Safety management system OHSAS18001:2007.
Grinding Instructions:
| 1 | For best results, trim all excess tendons, cartilage, cords and blood clots and remove meat from bones |
| 2 | Optimal results occur when meat is chilled to 32-34℉ before grinding |
| 3 | Cut meat into pieces that will easily fit in throat of grinder head |
| 4 | Place cubed meat into tray |
| 5 | Be sure not to over fill the tray |
| 6 | Make sure the throat opening of the tray remains clear and open |
| 7 | Place a dish, bowl or tray under grinder head to catch ground meat |
| 8 | Switch grinder to on position |
| 9 | Carefully begin to feed meat down the throat |
| 10 | Use plunger to push meat |
| 11 | Do not sue fingers or utensils other than the plunger provided |
| 12 | Bodily injury may occur and you could damage your grinder |